Solar Deck Lights and In-Ground Disk Lights: Placement and Spacing
Surface-mount deck lights or flush in-ground disks? Where each goes, how far apart to space them, and how to fit disk lights so they drain and charge.
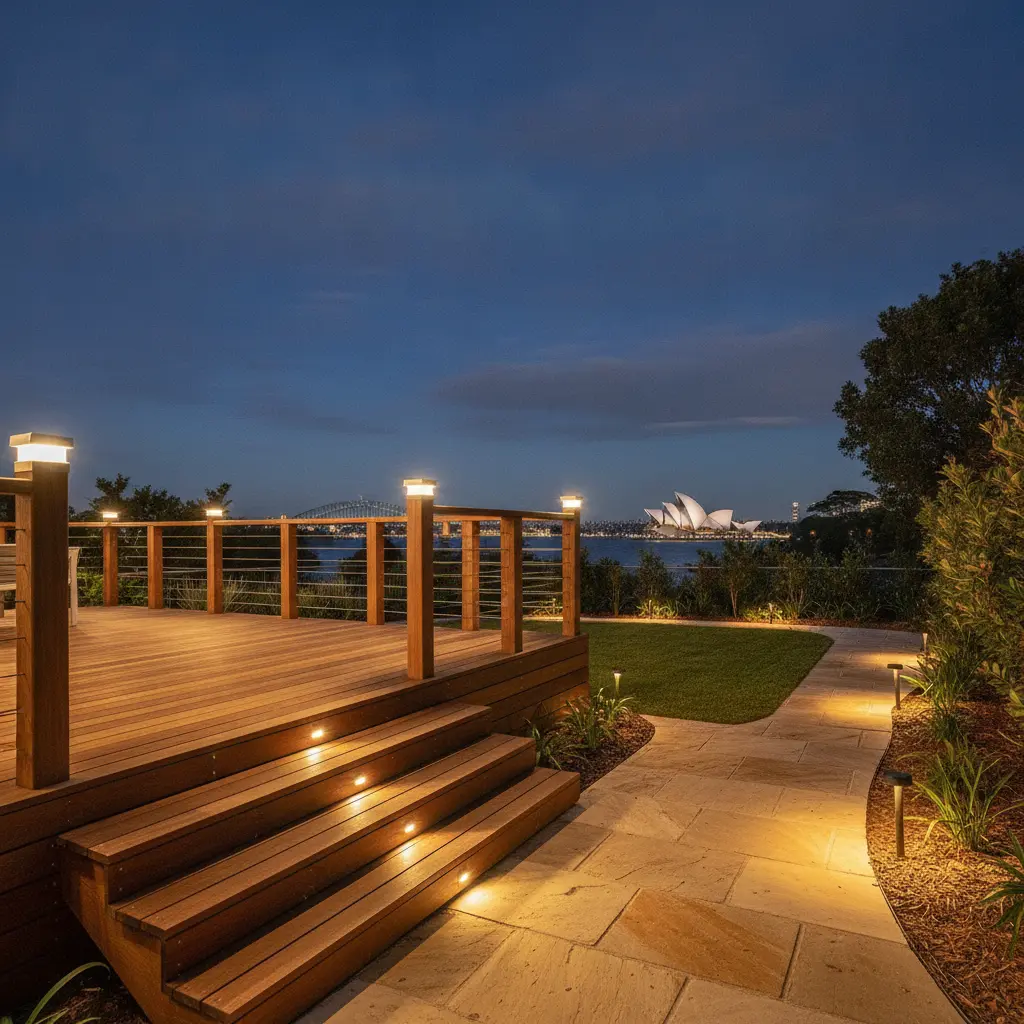
Solar deck lights come in two main forms: surface-mount lights that screw to deck posts, fascia boards and stair risers, and flush in-ground disk lights that sit level with the lawn, a garden bed or the edge of a path. Put surface-mount lights on the deck and its steps, and in-ground disks in the ground around it. Neither needs wiring, but every panel needs several hours of direct sun.
- Surface-mount deck lights fix with two screws to posts, fascia boards, balustrade posts and step risers.
- In-ground disk lights press into soil so the top sits flush. They suit lawn edges, garden beds and the soil strip beside paving, not driveways or wheel paths.
- Spacing: about 1.5–2 m apart along a deck edge or path edge, and a light on every second riser for most stairs.
- Sun: each panel needs roughly 6–8 hours of direct sun, so lights tucked under eaves or a solid roof charge poorly.
- Weather: look for IP65, which means dust-tight and protected against water jets.
What is the difference between solar deck lights and in-ground solar lights?
"Solar deck lights" is a loose term. Some sellers use it for small lights that screw onto the deck structure; others mean round lights recessed into the decking boards. In-ground solar lights, often sold as solar disk lights, are made to be pushed into soil so that only the top face shows. The two do different jobs, and most decks benefit from both: one marks the edge and the steps of the deck itself, the other marks the ground around it.
| Type | Where it fixes | What it does well | Watch for |
|---|---|---|---|
| Surface-mount (wall, fence and step lights) | Deck posts, fascia boards, balustrade posts, step risers, sandstone walls | Marks the deck outline and every change of level; sits above the ground so grass and mulch cannot bury it | The panel must face open sky, not the underside of a roof |
| Flush in-ground disk lights | Lawn edges, garden beds, soil beside paving and stepping stones, around trees | Almost invisible by day, a low glow at ground level by night, nothing to trip over | Needs drainage underneath and a clear top; not for wheel paths |
| Recessed in-deck lights | Holes drilled through decking boards | A clean look on a new deck | Hard to service, and the hole in the board is permanent |
We do not sell recessed in-deck lights, mostly for that last reason: once a hole is drilled through a decking board, swapping the fitting or its battery later is awkward. A surface-mount light on the fascia or a post does the same job and comes off with two screws.
Where should in-ground solar lights go?
The Solar In-Ground Disk Light is a stainless steel and ABS disk that sits flush in the ground and shows as a glow at night. It suits places where a stake light would look cluttered or get knocked over.
Lawn edges
A line of disks along the boundary between lawn and garden bed gives the yard a clear shape after dark. Set them a few centimetres inside the bed edge so the mower runs on the lawn, not over the lights.
Garden beds and around trees
Two or three disks at the base of a feature shrub or small tree add depth without the glare of a spotlight. Keep them clear of mulch, which creeps over the panel within a season.
Path edges and stepping stones
Disks set in the soil beside a path mark its line at foot level. They pair well with stepping stones in a lawn, where a stake light would sit awkwardly in the middle of the grass.
Sandstone paving borders
Beside a sandstone paved terrace, set the disks in the garden strip or lawn along the paving edge rather than cutting them into the stone. The pale sandstone catches the warm light and the edge of the terrace reads clearly. If you are laying new paving, leave a soil strip about a hand's width wide along one side for lights.
Low deck edges
Where a low deck meets the lawn, disks set in the ground a short step out from the fascia mark the drop without anything fixed to the timber.
Where do surface-mount deck lights go?
On the deck itself, the Stainless Solar Wall & Fence Light fixes with two screws to posts, fascia boards and balustrade posts, gives a soft warm white glow and switches on by itself at dusk. Common positions:
- Deck corners and posts: one on each corner post defines the outline of the deck when you look out from the house.
- Long fascia boards: one every 1.5–2 m along the visible edge marks the drop to the lawn.
- Balustrade posts: fix to the outer face of every second post so the panel faces open sky.
- Deck stairs: the Solar Step Light is a stainless, low-glare light that throws its light down onto the tread. Fix one to every second riser, alternating sides on wider flights.
For more layouts, including handrails, built-in seats and level changes, see our guide to deck and stair lighting ideas.
How far apart should solar deck and in-ground lights be?
Solar marker lights show an edge rather than lighting a whole surface, so spacing is about keeping the line readable. Treat these as starting points and adjust after a few evenings.
| Location | Light | Spacing | Example |
|---|---|---|---|
| Deck fascia or outer edge | Wall & fence light | 1 every 1.5–2 m | 6 m edge: 4 lights |
| Deck corners and posts | Wall & fence light | 1 per corner, or every second post | Square deck: 4 lights |
| Deck stairs, up to 4 steps | Step light | 2 lights, alternating sides | 3 steps: 2 lights |
| Deck stairs, 5–8 steps | Step light | Every second riser | 6 steps: 3–4 lights |
| Lawn and garden bed edges | In-ground disk | 1 every 1.5–2 m | 8 m bed edge: 4–5 disks |
| Path edges | Disk or stake light | 1 every 1.5–2 m, alternating sides | 10 m path: 5–6 lights |
| Around a tree or shrub | In-ground disk | 2–3 per feature | 1 small tree: 2–3 disks |
| Driveway border (beside the wheel paths) | Disk and stake lights | 1 every 2.5–3 m | 9 m drive: 3–4 per side |
Our guide to how many step lights you need covers stair flights in more detail.
How to install in-ground solar disk lights
Disk lights are the one solar fitting where the install decides how long they last. The usual failures are water sitting on or under the light, and soil or mulch covering the panel.
- Charge first. Switch each light on (if it has a switch) and leave it in full sun for a day before installing, so you know it works.
- Check the sun. Look at each spot at midday and mid-afternoon. If the house, a fence or a dense tree shades it for most of the day, move it.
- Avoid low spots. Do not set disks where water pools after rain, at the foot of a slope or below a downpipe outlet. IP65 means protected against water jets, not sitting in a puddle.
- Cut the hole. Use a bulb planter or narrow trowel to cut a neat hole the depth of the disk body. In lawn, cut and lift a plug of turf first.
- Add drainage. Put a couple of centimetres of coarse sand or fine gravel in the base so water drains away from the underside instead of collecting around it.
- Set it flush or slightly proud. The top should sit level with the surrounding soil or a few millimetres above it, so rain runs off. Firm the soil around the sides.
- Keep it clear. Trim grass back from the rim and keep mulch and leaves off the top. A buried panel cannot charge.
The disks have no published vehicle load rating, so keep them out of driveways and wheel paths. On a driveway, set them in the lawn or garden border beside the drive.
Will solar deck lights charge under eaves or a pergola?
This is the most common reason a deck light disappoints. Many decks sit under a roof, an eave or a pergola, and a panel looking up at the underside of a roof gets little more than reflected light. As a rule, a solar panel needs roughly 6–8 hours of direct sun to charge well.
- Under a solid roof or deep eave: fix lights to the outer posts or fascia beyond the roofline, where the panel sees sky. On a stair that runs out from under a roof, the lower risers often charge well and the top ones poorly.
- Under an open pergola: light filters through, but charging varies through the day. Test one light there for a week before fixing the rest.
- Which face of the post: in Sydney the sun sits in the northern sky, so a light on the south face of a post spends much of the day in the post's own shadow. Use the north or west face where you can.
- Winter: the sun is lower and shadows are longer, so a spot that is sunny in January may be shaded in July. Shorter run-times in winter are normal.
If a spot gets no useful sun at all, solar is the wrong tool for it. Our comparison of solar and wired outdoor lighting explains when cabling is worth it. If lights you have already fitted are dim or fading early, work through our guide to solar lights not working.
Which lighting kit suits a deck and garden?
- Fence, Deck & Step Lighting Kit: eight stainless wall and fence lights for deck posts, the fascia and a short flight of steps.
- Path & Ground Lighting Kit: six stake lights for the path off the deck and four in-ground disks for the beds beside it.
- Driveway Edge & Path Kit: eight disks and six stake lights for a long path or the border of a driveway.
For a plan that also takes in walls, trees and the entertaining area, see our outdoor lighting ideas.
Light your deck and garden with Stone Front
Our solar lights are IP65 rated and give a warm white glow chosen to sit well beside the sandstone we quarry at Glenorie. Browse the solar path lights range to compare disk, stake and step lights, then pick the kit that matches your deck.
Frequently Asked Questions
Can you drive over solar in-ground lights?
Not ours. The Solar In-Ground Disk Light has no published vehicle load rating, so keep it out of driveways and wheel paths. Set disks in the lawn or garden border beside the drive instead, about 2.5–3 m apart, where they mark the edge without being driven over.
Can I set solar disk lights into sandstone paving?
We suggest not. Coring holes through pavers weakens the stone and leaves a hollow that collects water around the light. Set the disks in a soil or lawn strip along the paving edge instead, and if you are laying new paving, leave a strip about a hand’s width wide for them.
Do solar deck lights need an electrician?
No. Solar deck lights are self-contained: each has its own panel and rechargeable battery, so there is no cabling to run. Surface-mount lights fix with two screws and disk lights press into the soil. Mains-powered outdoor lighting, by contrast, must be installed by a licensed electrician.
Are solar deck lights bright enough to eat by?
No, and they are not meant to be. Deck and in-ground solar lights are marker lights that show edges and steps. For a dining area, add downward wall wash lights on a nearby wall or fence and use a separate table light; several low lights work better than one bright one.
Will a mower or whipper snipper damage in-ground lights?
It can. Set disks a few centimetres inside the garden bed edge rather than in open lawn, keep the top flush with or just above the soil, and trim around them by hand. A disk sitting below the turf line is also more likely to be buried by clippings.