How to Build a Sandstone Log Retaining Wall (Step by Step)
Footing, first course, ag pipe drainage, setback and capping — plus quantities, weights and approvals for a sandstone log wall in Sydney.
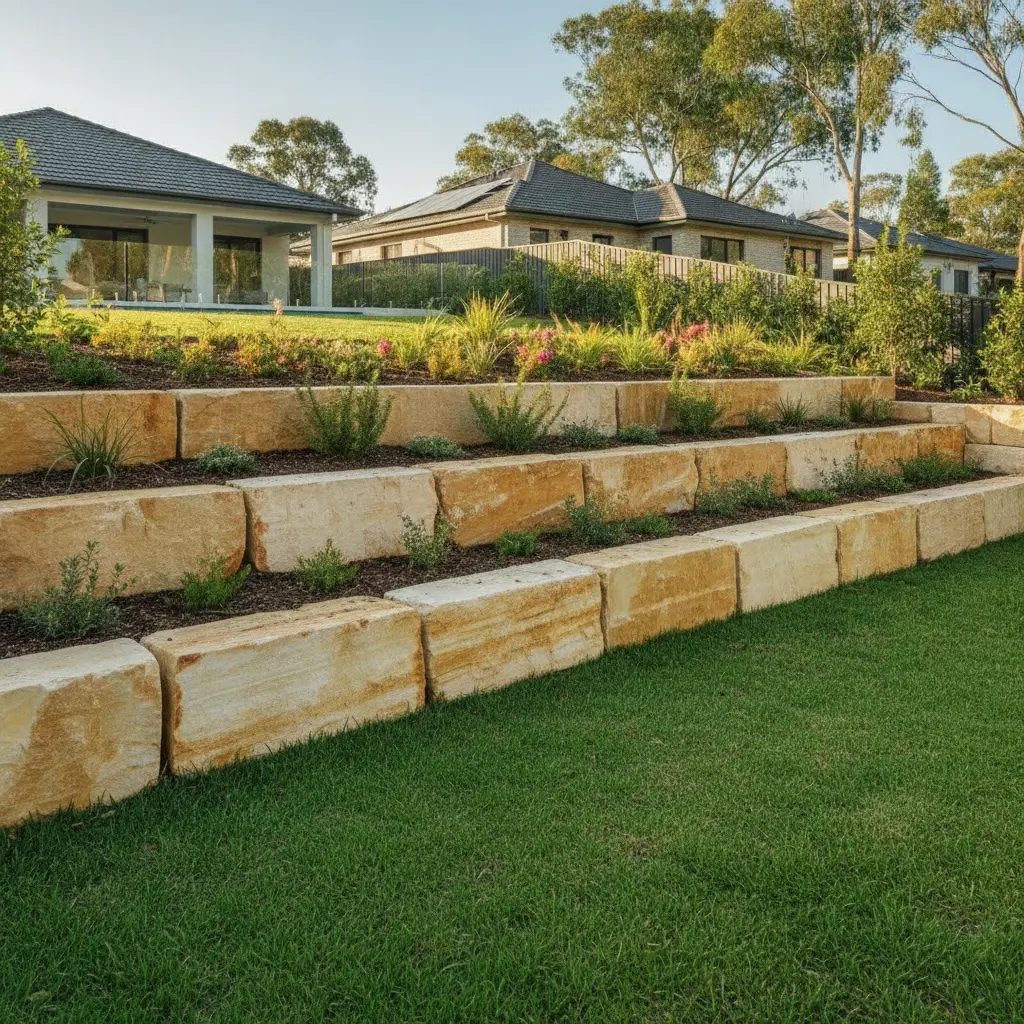
To build a sandstone log retaining wall, excavate and compact a level footing, bed the first course of split logs partly below ground, lay slotted ag pipe with free-draining backfill and geotextile behind it, then stack the next courses with staggered joints and a slight setback. With 300mm logs, a 900mm wall is three courses; most single-skin log walls stop at about 1m before engineering is needed.
- Log size: approx 300 x 300mm cross-section, sawn top and bottom, natural rough split face, various lengths
- Height per course: about 300mm, so three courses give roughly 900mm
- Weight: about 0.09m³ of stone per lineal metre of log, or roughly 210kg per metre
- Height limit: a single-skin log wall typically goes to about 1m before engineering is needed
- Approval: most NSW councils require approval for walls over about 600mm or near a boundary — check yours
What is a sandstone log retaining wall?
A sandstone log retaining wall is built from long, squared lengths of natural sandstone stacked horizontally, much like timber sleepers but in stone. Our sandstone split logs are quarried, sawn and split at Glenorie with a cross-section of approximately 300 x 300mm. They are sawn top and bottom, so each course sits flat on the one below, while the exposed face is left as a natural rough split face. Logs come in various lengths, so a wall goes up with far fewer joints than a block wall.
Because each log is large and heavy, a log wall goes up quickly once the footing is right, and the mass of the stone does much of the retaining work. That is why sandstone landscaping logs are a popular choice for terracing sloping blocks, building raised garden beds and holding back cuttings beside driveways. If you are still choosing between materials, our comparison of sandstone logs vs blocks covers the look, cost and installation differences, and our guide to building a sandstone block retaining wall covers the block method in detail.
Do you need council approval for a log retaining wall?
Check before you dig. Most NSW councils require approval for retaining walls over about 600mm high, and for walls of any height close to a boundary, near a building or easement, or supporting a load such as a driveway, pool or structure above. Rules differ between councils and change over time, so confirm the requirements for your property with your council or a private certifier.
Engineering is a separate question from approval. A single-skin sandstone log wall typically goes to about 1m before engineering is needed. Above that height, or wherever the wall supports a surcharge load, sits on poor or reactive clay soil, or retains a steep slope, an engineer should specify the footing, setback and drainage, and whether the wall should be stepped or tiered. Building two lower walls with a planted terrace between them is a common way to retain a taller bank without one large wall.
How many sandstone logs do I need?
Work it out by the course. Each log course adds about 300mm of height, and every metre of wall needs one lineal metre of log per course. Count the bottom course, which sits partly below ground, in your total height.
| Total wall height (incl. buried course) | Courses of 300mm logs | Log needed per metre of wall | Approx. stone weight per metre of wall |
|---|---|---|---|
| 300mm | 1 | 1 lineal metre | about 210kg |
| 600mm | 2 | 2 lineal metres | about 420kg |
| 900mm | 3 | 3 lineal metres | about 620kg |
| 1,200mm | 4 | 4 lineal metres | about 830kg — beyond the typical single-skin limit, so get engineering |
The weights use a working density of about 2,300kg per cubic metre: a 300 x 300mm log contains 0.09m³ of stone per lineal metre, or roughly 210kg. A 10m wall three courses high therefore needs about 30 lineal metres of log weighing around 6 tonnes, which is why delivery and machinery planning matter. Allow a little extra length for corners, returns and steps, and tell us your wall length and height so we can select log lengths that keep joints to a minimum.
Tools and machinery for a sandstone log wall
Sandstone logs are installable with small machinery, but they are not a lift-by-hand product. At roughly 210kg per metre, a 2m log weighs over 400kg. Plan on:
- A mini excavator or skid-steer loader with a suitable lifting attachment (forks, a stone grab, or lifting strops rated for the load) to place each log
- A plate compactor for the footing and each layer of backfill
- String lines, pegs and a laser or long spirit level to set the line and level of the first course
- Pinch bars and hardwood packers for fine adjustments once a log is down
- A diamond-blade saw for any trimming on site — though most cutting is easier done at the quarry, where we cut to size
- Ag pipe, geotextile fabric, drainage aggregate, shovels and a wheelbarrow
Check site access before you order. Logs are heavy and long, so a truck needs to get reasonably close to the work area. For tight or steep sites we offer crane-truck delivery across greater Sydney, which can lift packs closer to where they are needed and save hours of machine work.
How to build a sandstone log retaining wall, step by step
Step 1: Set out and excavate
Peg out the wall line with string lines and mark the finished height at each end. Cut back the bank so you have working room behind the wall for drainage — allow at least 300mm behind the logs. Excavate a level trench for the footing into firm, undisturbed ground; never build off loose fill or topsoil. On a sloping site, step the trench in 300mm increments so each step matches one log course.
Step 2: Build a compacted footing
For low garden walls, a compacted base of road base or crushed sandstone is commonly used, placed in layers of roughly 100–150mm and compacted with a plate compactor until firm. Higher walls, walls on clay and walls under load usually call for a concrete footing to an engineer's specification. Screed the top of the base dead level along the wall line: the first course can only be as straight as the footing beneath it.
Step 3: Lay the first course
Lower the first logs onto the footing so they sit partly below finished ground level. This embedment helps stop the base of the wall sliding forward. Level each log along its length and front to back, then tilt it very slightly back into the slope. Butt the log ends tightly together. Because the logs are sawn top and bottom, a level first course gives you a flat bed for every course above it.
Step 4: Install drainage behind the wall
Drainage decides whether a retaining wall lasts. Lay a 100mm slotted ag pipe in a filter sock along the back of the first course, falling to a stormwater point or a safe outlet at one or both ends. Line the cut bank with geotextile fabric, then fill the space between the fabric and the logs with clean, free-draining aggregate. The fabric stops fine soil washing into the aggregate and clogging it. Water that can drain away cannot build up pressure behind the logs — and trapped water is the most common reason retaining walls lean, bulge or fail.
Step 5: Lay the upper courses with a setback
Place each new course so the vertical joints are staggered from the course below, like brickwork, rather than lining up. Set each course back slightly into the slope (the batter) — a setback of a few centimetres per course is common for gravity walls, but follow your engineer's figure if you have one. Raise the drainage aggregate and geotextile with each course, and compact the general backfill behind the drainage zone in layers. Crushed sandstone is a practical general fill for that zone, while the free-draining aggregate stays directly against the stone and around the pipe.
Step 6: Cap and finish
Because the logs are sawn on top, the final course already gives a flat finish that doubles as garden seating. Fold the geotextile over the top of the drainage aggregate, finish with topsoil, and plant the bed above to bind the surface. Direct roof and surface water away from the top of the wall rather than letting it pour over or soak in behind it.
Common mistakes with sandstone log walls
- Skipping the ag pipe or geotextile: saturated soil behind the wall pushes it over time
- Building on fill or topsoil: the wall settles unevenly and joints open up
- Stacking courses perfectly vertical: a small setback per course helps the wall resist soil pressure
- Lining up the joints: continuous vertical joints create lines of weakness
- Going above about 1m single-skin without engineering: tiered walls or an engineered design are the safer path
- Underestimating weight: sort out machinery, access and where the delivery will be set down before the truck arrives
Logs, blocks or boulders: which suits your wall?
Sandstone logs suit long, straight runs, garden terraces and driveway cuttings, where their strong horizontal lines and few joints look clean and the machine work pays off. Sandstone blocks, with a standard bedwidth of 110mm and heights from 100mm to 300mm, suit curves, steps and walls close to the house where finer, brick-like coursing is wanted, and most can be placed by hand. Boulders give a natural, irregular look; select boulders are more shaped, so they stack into a more structured wall and cost less than sawn blocks.
For log wall options, colours and pricing, see our sandstone log retaining wall Sydney page, or browse the full range of sandstone logs in Sydney.
Get sandstone logs from Stone Front
Our split logs are quarried, sawn and split on site at Glenorie, and you are welcome to inspect stock and hand-select at the yard (Monday to Friday 7:00am–3:30pm, Saturday 8:00am–midday). Send your wall length, height and site access details through our quote form and we will price the logs, crushed sandstone and delivery together — final pricing depends on quantity, finish and delivery.
Frequently Asked Questions
How much does a sandstone log retaining wall cost?
Sandstone split logs are priced by quote, because the cost depends on log length, colour, quantity and delivery. As a quantity guide, a 10m wall three courses high needs about 30 lineal metres of log. Excavation, footing, drainage, machinery and labour are often a large share of the total, so get itemised quotes from installers.
Can I build a sandstone log wall myself?
A confident DIYer can build a low log wall with a hired mini excavator or skid-steer and a lifting attachment, because each metre of 300 x 300mm log weighs about 210kg. Walls over about 600mm, near boundaries or under load usually need council approval, and walls above about 1m need engineering, so most people use a landscaper for those.
What colours do sandstone logs come in?
Colours come from the quarry run at Glenorie and include Marbled White, White with Greys, Light Yellow, Banded Yellow, Medium Yellow with Purples, Browns, Orange and Purples. Because natural colour varies, the most reliable way to choose is to visit the yard and inspect stock, or send photos so we can match a colour batch.
Do sandstone logs need to be sealed?
Sealing is optional on a retaining wall. Sandstone is porous, so if you want to reduce staining on the top course or in splash zones, use a penetrating (impregnating) sealer and expect to reseal every 2–3 years outdoors. Avoid acid-based cleaners on sandstone, as they can damage the stone.
Can sandstone logs be cut to length?
Yes. Split logs come in various lengths, and we offer custom cutting to size at the quarry, which is easier and cleaner than trimming heavy logs on site. Give us your wall length, corners and any steps or returns, and we can plan log lengths that keep joints to a minimum.